Getting dressed after rotator cuff surgery can feel like an impossible task overnight. One day you are pulling on a t-shirt without a second thought, and the next you are sitting on the edge of your bed wondering how to get your arm through a sleeve without undoing everything your surgeon just fixed. That frustration is completely normal, and it will get better. This guide walks through exactly what to do, phase by phase, so you can dress safely and independently from day one of recovery.
At a Glance
| Topic | Key Facts |
|---|---|
| Primary rule | Operated arm goes in first when dressing; comes out last when undressing |
| Sling protocol | Typically 4 to 6 weeks post-op; sling is worn over clothing |
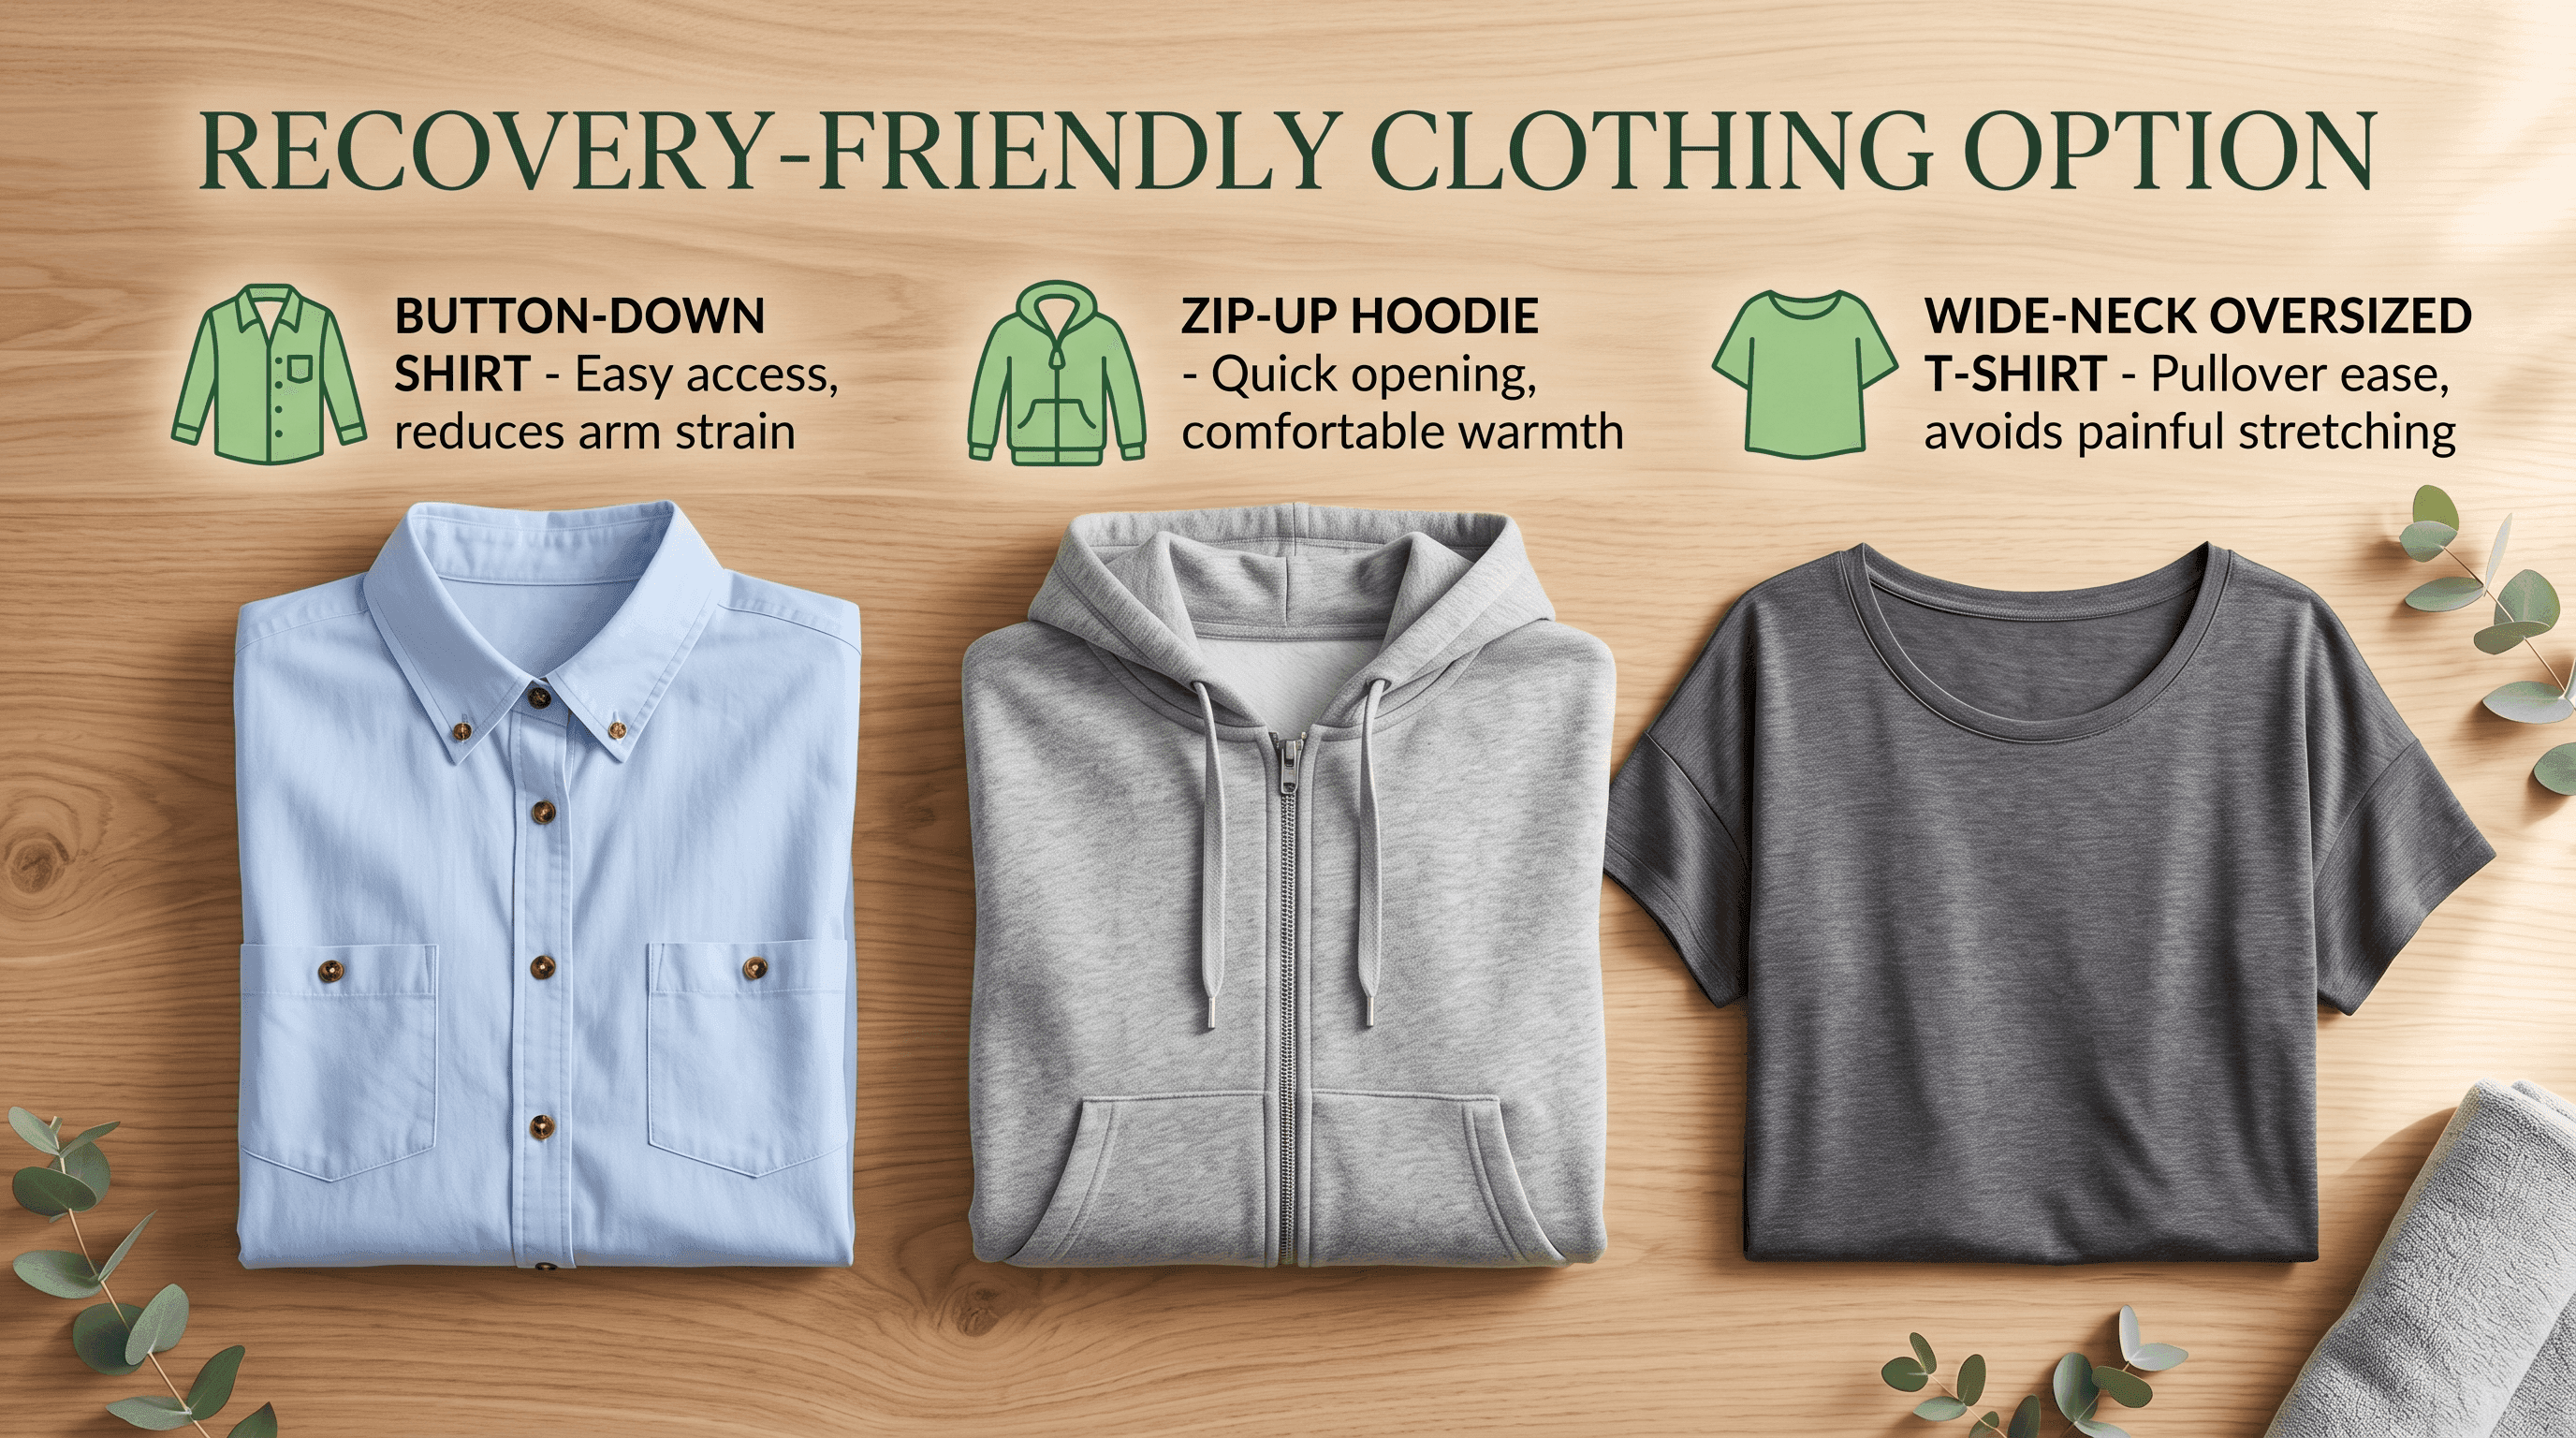
| Safest shirt types | Oversized button-downs, zip-up hoodies, wide-neck loose tops |
| Movements to avoid | Raising the arm above shoulder height, pulling tight necklines overhead |
| Adaptive tools | Dressing stick, one-handed button hook, long-handled shoehorn |
| Bra guidance | Front-closure or sports bra recommended for the first 4 to 6 weeks |
| OT referral | Available at discharge; request a dressing tutorial before leaving the hospital |
The Golden Rule of Dressing Post-Op
Every occupational therapist and physical therapist working in orthopedic recovery will tell a patient the same thing: operated arm in first, operated arm out last. This one principle governs every dressing technique covered in this guide, and understanding why it works makes it much easier to follow consistently.
When the operated arm goes in first, the shirt fabric is already positioned around it before any reaching, pulling, or maneuvering begins. The healthy arm does the active work of guiding the garment into place, while the repaired shoulder stays passive and protected. Reversing this sequence, even once, forces the surgical shoulder into movements it cannot safely handle in the early weeks of healing.
The reverse applies at undressing: the healthy arm exits the sleeve first, creating slack in the garment so the operated arm can be slipped out with minimal resistance. No pulling, no tugging, no sudden movements. Think of it as always giving the repaired shoulder a clear, unobstructed path.
Wardrobe Prep: What to Buy Before Surgery
Preparing the right clothing before the surgery date removes a significant source of stress during recovery. Ideally, set up a small recovery wardrobe one to two weeks in advance so everything is washed and accessible.
Button-down shirts in a size one to two larger than normal are the easiest option for the first several weeks. A roomy fit means the fabric drapes over the arm rather than requiring active threading through a tight sleeve. 100% cotton or soft linen works best because the fabric does not cling.
Zip-up hoodies and front-zip fleeces are the closest thing to a button-down for cooler weather. The front opening allows the same operated-arm-first approach without any overhead motion involved.
Wide-neck, oversized t-shirts and pullover tops in a size or two larger than usual can work for later weeks once swelling decreases, though they require more technique than front-opening garments. Opt for fabrics with some stretch; rigid cotton can bind against the arm during the threading process.
Adaptive clothing with velcro or snap closures exists specifically for post-surgical recovery. These garments open fully along the shoulder seam, letting a patient slip their arm in without any threading at all. Several medical apparel brands produce these for both men and women.
What to avoid entirely: tight turtlenecks, fitted long sleeves, racerback tops, underwire bras, and any garment that must be pulled over the head with both arms raised. These categories are simply off the table for the first six weeks.
Step-by-Step: Putting on a Button-Down Shirt or Zip-Up
This is the easiest method to learn and the one most occupational therapists teach first. The technique below applies to button-down shirts, zip-up hoodies, and any garment with a full front opening.
Step 1. Sit on a stable surface, like the edge of a bed or a sturdy chair. Do not try to dress while standing during the early weeks of recovery, as balance can be affected by pain medication and limited arm use.
Step 2. Hold the shirt open in front of you using your healthy hand. Let it hang so the collar is at the top and the operated-arm sleeve is facing you.
Step 3. Slide the operated arm into its sleeve first. Use gravity and a gentle forward lean, sometimes called the pendulum position, to let the arm hang naturally while the sleeve slides up. Do not lift the arm or shrug the shoulder.
Step 4. Once the operated arm is fully inside the sleeve and the shoulder seam sits in the right position, use the healthy hand to pull the shirt fabric around your back.
Step 5. Slide the healthy arm into its sleeve. This step requires only standard arm movement and should feel straightforward.
Step 6. Button or zip from the bottom up using the healthy hand. A one-handed button hook, available inexpensively at most pharmacy chains, makes this significantly faster during the early weeks.
If your dominant arm is the operated side, this entire sequence is performed with your non-dominant hand. That is harder than it sounds, and practicing before surgery with the non-dominant hand alone, even just buttoning and unbuttoning a shirt, builds useful muscle memory before the procedure takes place.
Step-by-Step: Putting on a Pullover or T-Shirt
Pullovers are more challenging than front-opening garments in the first few weeks, but an oversized pullover can be managed safely with the right technique. The neck hole is the main obstacle; the goal is to get the operated arm fully in place before the shirt ever goes over the head.
Step 1. Sit on a stable surface with the shirt in your lap, collar facing away from you.
Step 2. Gather the shirt fabric so the operated-arm sleeve is easy to identify. Slide the operated arm in first, threading it through the sleeve until the cuff is past the wrist and the shoulder seam is roughly in position.
Step 3. With the operated arm inside the sleeve and the shirt draped across your forearm, duck the head through the collar. Do not tug the collar down with the operated arm. Let the fabric fall as the head passes through.
Step 4. Once the head is through, slide the healthy arm into its sleeve.
Step 5. Use the healthy hand to adjust the shirt into place. Smooth it down the torso without raising either arm above shoulder height.
A wide-neck shirt makes Step 3 considerably easier. The clinical recommendation from most post-surgical protocols is to keep the elbow at no more than 10 to 15 degrees of extension during this phase, meaning the arm stays close to the body and does not extend outward while threading. If the neck hole is too tight to pass over the head comfortably with that constraint, the shirt is not right for this stage of recovery.
The Reverse Process: How to Safely Take a Shirt Off
Undressing is where many patients accidentally compromise the repair because it feels less controlled than dressing. The golden rule reverses here: the healthy arm comes out first.
For a button-down or zip-up: Unbutton or unzip using the healthy hand. Shrug the healthy arm out of its sleeve first, letting the shirt hang from the operated shoulder. Then carefully slide the operated arm out by guiding the sleeve down and off. The operated shoulder remains passive throughout.
For a pullover: Use the healthy hand to gather the back hem of the shirt and pull it upward until it clears the torso. Keep the operated arm low and passive. Bring the collar up and over the head, then slide the healthy arm out first. Finally, guide the operated arm out of its sleeve by grasping the sleeve from the outside and easing it off.
The T-shirt bunching technique, where the healthy hand gathers the back fabric into a handful before pulling upward, prevents the shirt from dragging against the operated shoulder during removal. This small adjustment makes a meaningful difference in comfort and safety.
Undergarments: Bras, Undershirts, and Adaptive Clothing
Bras and Undergarments for Women
Standard bra clasps at the back are not manageable with one functional arm during early recovery, and any bra that pulls over the head creates the same overhead motion risks as a tight pullover.
Front-closure sports bras are the most practical solution for the first four to six weeks. They can be fastened and unfastened one-handed, and they provide adequate support without requiring overhead arm movement. Look for styles that close with a single central clasp rather than multiple hooks, as these are easier to manage with one hand.
Step-in bras allow a patient to step into the garment through the leg openings and pull it up, entirely bypassing the need to thread arms through straps. These work well for patients who find even front-closure clasps difficult in the first week or two.
Adaptive bras with velcro or magnetic closures have entered the market specifically for post-surgical patients and patients with limited hand function. These require minimal grip strength and no coordination of two hands.
Most surgeons clear patients to return to standard bra use around the four to six week mark, though individual recovery varies. Confirm with the surgical team before switching back.
For men and women alike, undershirts and camisoles in soft stretch fabric are easier to manage than structured undergarments in the early weeks. Loose-fitting tank tops in a size up can be applied using the same pullover technique described above.
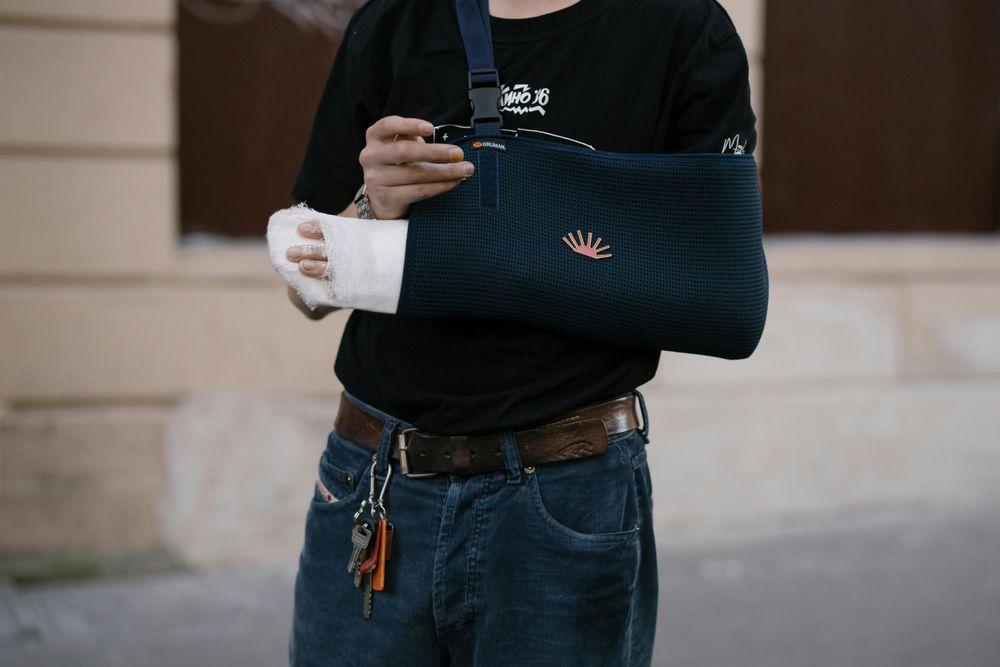
Managing the Shoulder Sling
The sling is worn over the clothing, not underneath it. This is a point many patients get wrong at home after discharge, and wearing the sling beneath a shirt places pressure directly on the healing structure and makes every wardrobe change far more complicated than it needs to be.
The correct sequence at dressing is: get dressed first, then reapply the sling on top. At undressing, remove the sling first, then change clothes, then reapply the sling before doing anything else that requires the arm to be free.
Most slings use a combination of a shoulder strap and a body strap. The body strap (the loop around the torso) can usually be left partially loosened during dressing changes to allow the shirt to slide under it more easily, then re-tightened once the garment is in place.
During sling wear, the elbow should rest at approximately 90 degrees of flexion and the forearm should remain neutral. Never let the operated arm hang fully down while manipulating clothing. If the sling comes off for any reason during dressing, replace it before continuing.
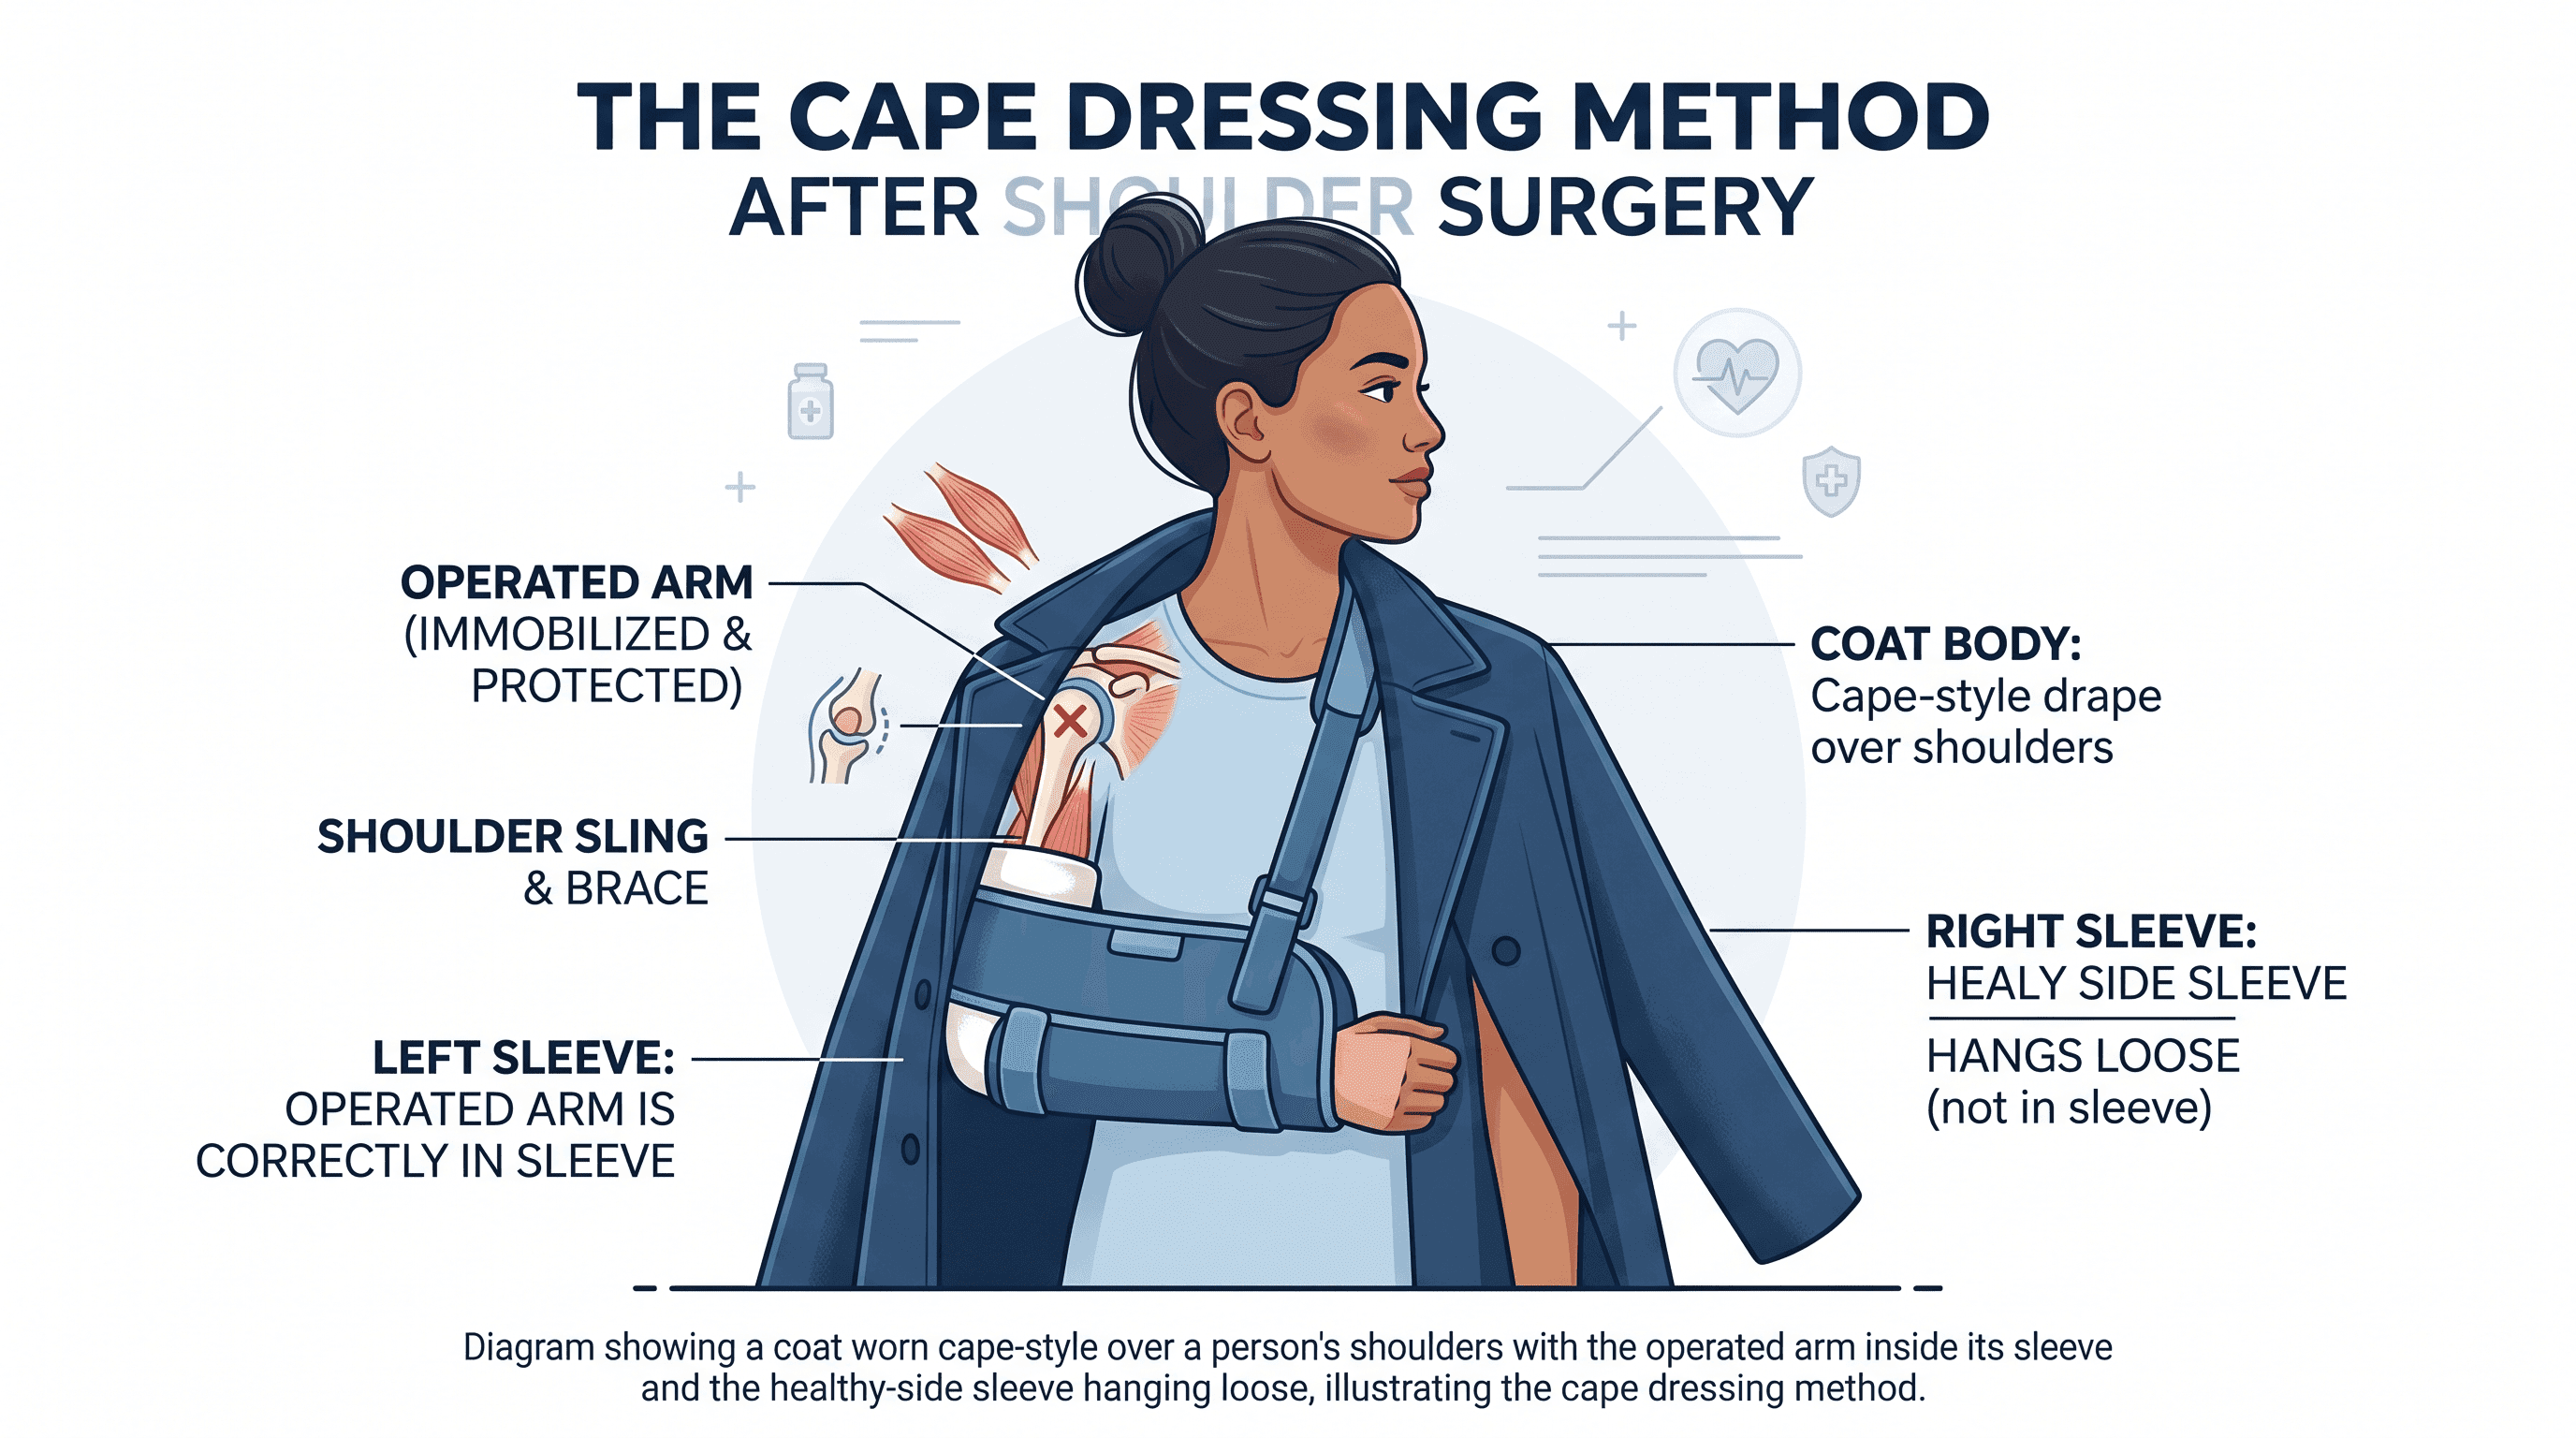
Cold Weather Modifications: Jackets and Coats
Winter coats and structured jackets are among the hardest garments to manage after shoulder surgery because they are stiff, fitted, and designed for two fully functioning arms. Forcing a post-surgical arm through a coat sleeve that resists movement is one of the more common ways patients cause pain flare-ups in recovery.
The simplest approach for cold weather is wearing a coat or jacket like a cape: the operated arm goes in its sleeve first using the standard technique, and the remaining fabric drapes over the healthy shoulder without threading that arm through its sleeve at all. A large pin or clip can secure the open lapel if needed.
Fleece zip-ups and quilted zip-front vests are the most practical outerwear choices because they open fully at the front and drape easily. A vest worn over a warm long-sleeve top provides core warmth without putting a tight sleeve over the surgical arm.
Poncho-style outerwear requires no arm threading at all and provides excellent coverage in cold or rainy conditions.
For formal situations where a proper coat is required, consider sizing up two or three sizes in a winter coat before surgery specifically for the recovery period. A coat that is loose enough to accommodate the sling underneath may allow both arms to be used more comfortably than a standard-fit garment.
Dressing Aids That Make It Significantly Easier
Occupational therapists routinely recommend a small set of adaptive tools for post-surgical dressing. These are not specialty items; most are available at pharmacies or online for under $20.
A dressing stick is a lightweight rod with a hook on one end and a push-pin on the other. It allows a patient to reach, hook, and pull clothing into position without bending forward excessively or using the operated arm. It is especially helpful for pulling up pants, managing waistbands, and hooking belt loops.
A one-handed button hook consists of a wire loop attached to a handle. The loop threads through the buttonhole, catches the button, and pulls it through. For patients with a non-dominant operated arm, this tool significantly speeds up the buttoning process in the early weeks.
A long-handled shoehorn eliminates the need to bend at the hip while managing footwear, which matters because bending low often creates compensatory shoulder movement without the patient realizing it.
A reacher and grabber is a hinged claw on an extension arm. It retrieves dropped clothing from the floor, pulls socks on, and helps position garments without bending. For patients whose operated arm is their dominant side, a reacher dramatically expands independent function in the first two weeks.
Five Mistakes That Could Re-Injure the Repair While Getting Dressed
These are the dressing-related errors that orthopedic surgeons and OTs see most often in follow-up appointments. Each one carries genuine risk of disrupting the tendon-to-bone repair that surgery achieved.
Raising the operated arm above shoulder height during dressing is the most common mistake. This applies even if the movement does not cause pain. The tendon repair is vulnerable regardless of whether pain is present as a warning signal, especially in the first four weeks.
Pulling a tight-neck shirt overhead with both arms at the same time forces the operated shoulder through the same overhead arc that the repair cannot tolerate. Even one instance of this is enough to cause a re-tear in the earliest phase of recovery.
Rushing through dressing before pain has settled increases the chance of sudden, poorly controlled movements. Give extra time in the morning, particularly on days when pain or stiffness is higher than usual. Trying to get dressed quickly when the shoulder is unhappy is a reliable path to injury.
Skipping sling reapplication after a wardrobe change leaves the operated arm unsupported and increases the risk of accidental movement during other morning activities. The sling comes back on immediately after dressing, every time.
Using the operated arm to push up from a bed or chair before dressing is complete places unexpected load through the repaired tendon. Always push up using the healthy arm, or use a chair with armrests to reduce the weight-bearing requirement entirely.
Pro Tip: Practice These Techniques Before Surgery
Most patients do not think about dressing until they are home from the hospital and genuinely struggling. Practicing one-handed dressing techniques one to two weeks before the surgery date changes that experience significantly.
Spend five to ten minutes each day buttoning a shirt, removing a pullover, and managing socks and footwear using only the non-dominant hand. The goal is not perfection; it is building enough familiarity that the techniques feel accessible rather than foreign when the operated arm is in a sling and pain is a factor.
This preparation matters most for patients whose dominant arm is the operated side. The non-dominant hand will suddenly be responsible for all fine motor tasks, and a small amount of deliberate pre-operative practice reduces frustration and supports earlier independence at home.
When to Ask Your Occupational Therapist
If getting dressed independently is still a consistent challenge beyond the first two or three weeks, requesting a formal occupational therapy referral is a reasonable and well-supported next step. OTs specialize in post-surgical activities of daily living (ADLs), and dressing training is one of the core skills they address.
Many patients are not aware that most hospitals offer a brief dressing tutorial at discharge as part of standard post-surgical care. If that session did not happen or did not cover enough ground, it can be requested at the first follow-up appointment.
An OT can assess specific challenges, recommend additional adaptive equipment, and tailor dressing sequences to a patient's home environment, clothing preferences, and recovery timeline. For patients with a dominant-arm repair or significant pain affecting movement, an OT referral is worth requesting sooner rather than later.
To connect with a qualified occupational therapist or orthopedic specialist who can guide recovery, find a doctor through Momentary Lab's verified provider directory.
FAQ
How do you wear clothes after rotator cuff surgery?
The core approach is to always dress the operated arm first and undress it last. Button-down shirts and zip-up hoodies are the easiest garment types for the first several weeks. Clothing should be one to two sizes larger than usual to accommodate the sling and reduce friction over the surgical area. Overhead motions and tight necklines should be avoided until the surgeon clears the patient for expanded range of motion.
How do you put on a shirt while wearing a sling?
The sling should come off only briefly during dressing changes, following the surgeon's specific guidance on how long the arm can be unsupported. Use the button-down or pullover technique described above, always starting with the operated arm, and reapply the sling immediately once the shirt is in place. The sling always goes on over the clothing, not underneath it.
What are the worst things to do after rotator cuff surgery?
According to the American Academy of Orthopaedic Surgeons, the most harmful behaviors after rotator cuff repair include using the operated arm to lift or push before clearance, raising the arm overhead in the early healing phase, missing physical therapy sessions, and ignoring persistent pain. In the context of dressing specifically, pulling tight garments overhead with both arms simultaneously and pushing up from bed with the operated arm are among the riskiest habits.
What vitamins help shoulder recovery?
Nutrition plays a supporting role in tendon healing. Research published in PMC supports adequate vitamin C intake for collagen synthesis, which is relevant to tendon repair. Vitamin D supports musculoskeletal health broadly. Omega-3 fatty acids may help modulate inflammatory responses during recovery. A doctor can advise on individual supplementation based on bloodwork and dietary intake. No supplement replaces the healing timeline set by the surgical repair itself.
How long does it take to dress independently after rotator cuff surgery?
Most patients gain meaningful dressing independence within the first two to three weeks when using the correct techniques and adaptive clothing. Full independence, including more fitted garments and standard undergarments, typically follows the sling removal milestone around weeks four to six. Individual timelines vary based on the extent of the repair, pain levels, and whether the dominant or non-dominant arm was operated on.
Can I use Momentary Lab to find answers about my recovery?
Yes. The Momentary Lab AI Healthcare Navigator can help orient questions about recovery, connect to relevant health information, and point toward the right type of care provider for post-surgical support.
References
- PMC / National Library of Medicine — Research cited on nutritional support and collagen synthesis relevant to tendon recovery.
- PubMed — Clinical literature on rotator cuff repair outcomes and post-surgical rehabilitation protocols.